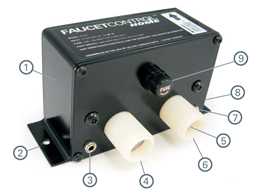
Hardware Layout
 1. Rugged Aluminum Case 1. Rugged Aluminum Case
2. Left Attachment Flange
3. Foot Pedal Connector
4. Hot Water Inlet (outlet on opposite side)
5. Cold Water Inlet (outlet on opposite side)
6. Stainless Steel Filter
7. 12-Volt Power Connector
8. Right Attachment Flange
9. Fuse Holder
Note: Home model pictured. RV model comes with a wiring harness.
Operation
- Select the desired water flow rate and temperature with your existing faucet handle(s).
- Apply light pressure to the foot pedal to activate water flow.
- Release pressure from the foot pedal to stop water flow.
NOTE: Once you find the desired flow rate and temperature, no future adjustments are
required. Just press the pedal to activate water flow.
Installation Overview
- Install Faucet Control™ between the water supply lines and faucet.
- Connect the foot pedal to Faucet Control™.
- Plug the power supply into an electrical outlet (or connect Faucet Control™ to
an RV or boat 12-Volt electrical system).
Technical Specifications
 |
 |
 |
| Compatibility |
Connects to any standard faucet |
| Inlet/Outlet Ports |
Accepts standard 1/2" FIP faucet connectors |
| Enclosure Dimensions (L x W x H) |
4.125" x 1.75" x 2.75" (excludes mounting flanges and ports) |
| Pressure |
Maximum recommended pressure 80 psi |
| Voltage |
12 VDC |
| Current |
800 mA at 12 VDC |
| Power Supply (Home Model) |
Input: 120 VAC/18W – Output: 12 VDC/800 mA |
| Valve Life |
More than 250,000 cycles |
|
 |
 |
 |
Installation Instructions
 Home Model (FCH-1) Installation Instructions Home Model (FCH-1) Installation Instructions
 RV Model (FCR-1) Installation Instructions RV Model (FCR-1) Installation Instructions
|
